Milestone 2: Creating a ROS 2 Node for Converting Data
By now you should have gone through the basics of creating a node in ROS 2 in class and milestone 1. As the most prominent form of ROS 2 node used in this class will be a publisher and subscriber, an assignment covering that with a full complex message structure would be useful.
This assignment or milestone will be to complete a full ROS 2 node on your own that converts LiDAR radial distance measurements into the cartesian form. This milestone has the following pertinent information
Due Date: February 10th, 2023
Pseudo Code Due Date: February 8th, 2023
Points: 20 (5 for Pseudo Code)
ROS 2 Topics: scan (subscribe to this) and cart_coord (publish to this)
ROS 2 Messages :
LaserScan(subscribing to this) ,PointCloud(both insensor_msgs, publishing this), andPoint32(ingeometry_msgs)
Download the Bag File here.
Download Launch Package here
You will need to run the bag file above to do this. Put the entire folder from this zip file in a folder, navigate to the specific folder and play it using the following command. the -l loops the bag file infinitely till you interrupt it.
ros2 bag play -l milestone2_bagfile
Deliverables
ROS 2 node that converts the LaserScan message to PointCloud and publish a cart_coord topic. If you want to test this live you can come in to the lab MAE-B 131 to test it out on one of the vehicles. Grading will be based on performance of the node,
if it publishes data correctly you will get full points. A full list of deliverables are given below
Pseudo Code for your Node. More information can be found here
ROS 2 Publisher Node publishing topic
cart_coordsetup.pyfile filled outpackage.xmlfile filled out properly.zip file containing entire package (We should be able to download the file and put it into ROS 2 and run it without changing anything)
Warning
The names of topics are important, writing the wrong name will result in a 25% point deduction.
LiDAR Data
First you must understand how the LiDAR data is being published. The LiDAR data is published in the ROS2 topic scan with the message LaserScan. You realistically only need the ranges part of the message and maybe the header for consistencies sake.
The ranges are stored in the form of distances in meters. To parse through the range data, it is important to understand Figure 1.
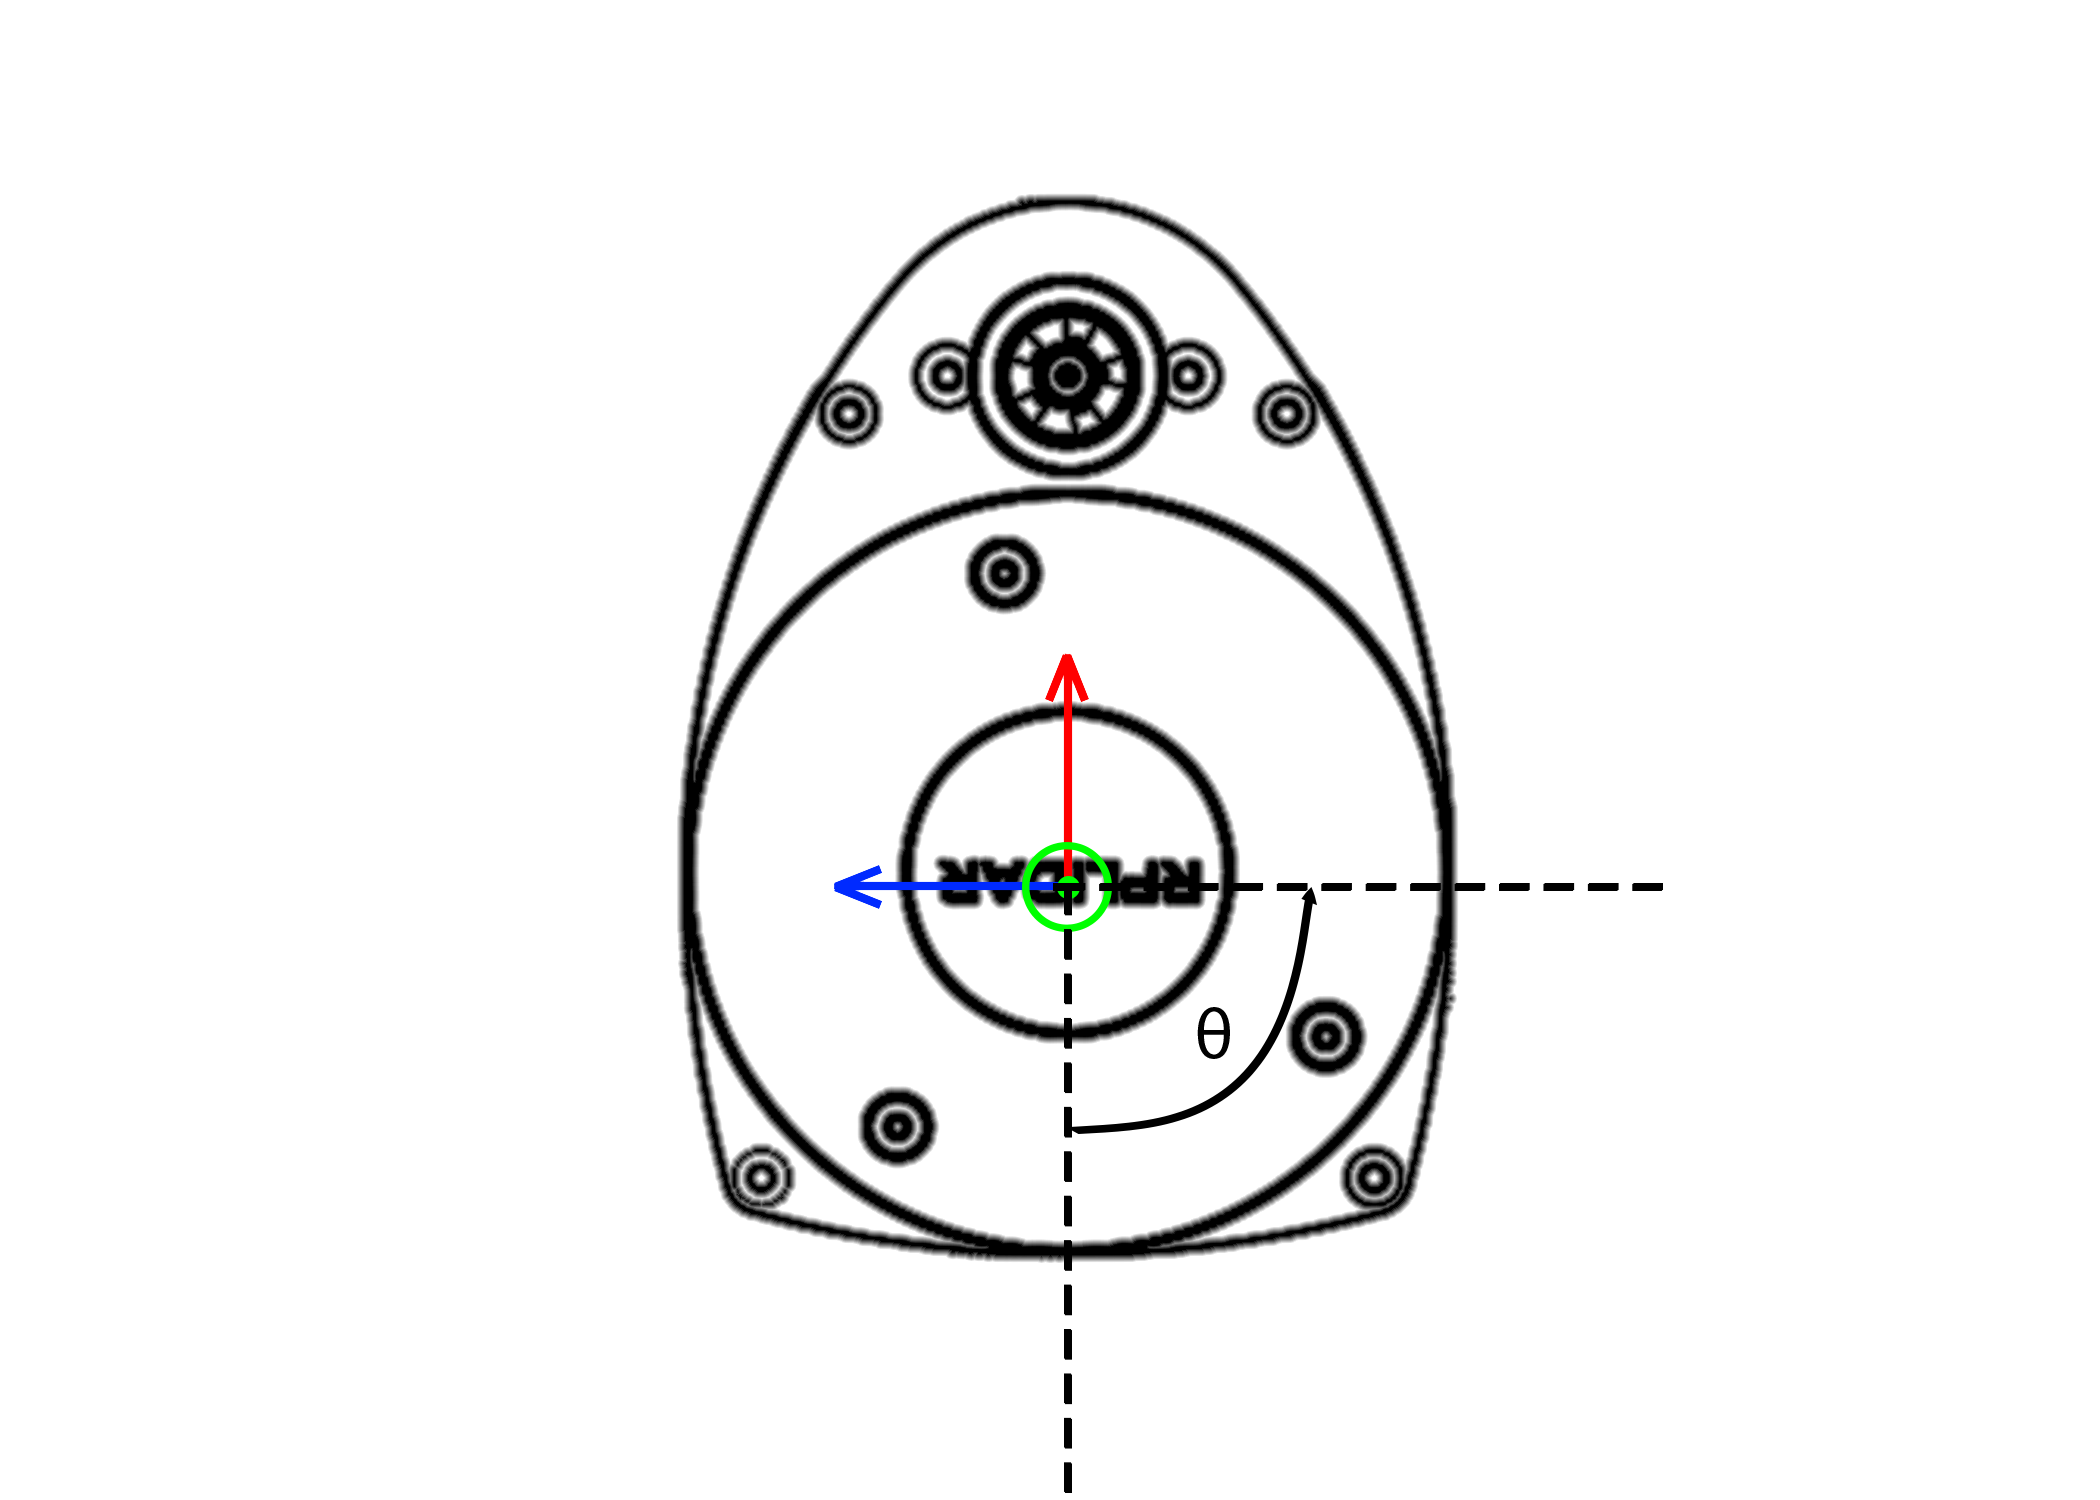
Figure 1: Ranges defined from 0 degrees. Red is \(+x\) and Blue is \(+y\).
Here on our Lidar, distances are given from the \(-x\) or \(180^{\circ}\) from the red arrow and move in a counter clock-wise direction. Therefore the first distance will point straight back on your car. There are 720 data points, therefore the angular resolution of the LiDAR is half a degree. Therefore to parse through the data if you want to get \(90^{\circ}\) degrees or \(180^{\circ}\) from the blue line you need to look for the data point \([180]\).
Warning
Remember that the data is 180 degrees out of phase, so you will have to account for that.
Converting Math
To convert a distance based on radians you can convert using simple trigonometry. The following equations will help you convert this data
and
where \(d\) is the distance from ranges, \(\theta\) is the angle that you are currently at, but remember it is \(180^{\circ}\) out of phase. That’s pretty much it, that is all you need to complete the conversion. Your \(z\) point will be 0.
Hint
You can accomplish this efficiently using Numpy.
PointCloud Message
Next you need to be able to get all this data into your PointCloud message. To do this it would be useful to iterate over the range data and append it. The PointCloud message requires
and array of Point32 points as its points array. It would also be useful to take the header data from the LaserScan message and plug into to the PointCloud Message.
You should know how to iterate over an array by now so that will not be covered, but to append to an array you can use the following
append(var)
Hint
Use a loop to accomplish this, loop through and figure out the \(x\) and \(y\) , with \(z\) as 0, add those to a Point32 message, then append it to the point cloud field PointCloud.points . Then publish the PointCloud outside both loops.
Visualizing the LaserScan and PointCloud
To visualize both the LaserScan and the PointCloud, you should be able to launch a file from your workspace that does this. You can download the launch package here. The following command will launch Rviz2
ros2 launch lidar_launch lidar_rviz_launch.py
That’s pretty much all you need to be successful in completing this milestone. If you have any problems contact the TA’s or Instructor.