Milestone 5: Stanley Controller Path Following Simulation
This milestone will cover how to write a stanley controller on your car to follow a path through a set of gps points. A brief powerpoint presentation on this can be found here . All the poses and the other info have been given to your in the eml4930_gps_nav repo.
Due Date: TBD
Points: 20
ROS 2 Topics:
vehicle_pose(sub),current_goal_pose(sub) andvehicle_command_ackermann(pub)ROS 2 Messages :
PoseStamped(ingeometry_msgs) andAckermannDriveStamped(inackermann_msgs)
To run this on your car you will need to git clone the eml4930_gps_nav repository that we have created for the car. You will need to clone
this into the appropriate workspace source folder, something like class_ws/src. That can be done by using the following command
git clone https://github.com/av-mae-uf/eml4930_gps_nav.git
If you have cloned it previously, run a git pull to update the repository. Don’t put any of your packages in the repo directory it will be deleted when you run the next update command.
Deliverables
ROS 2 node that runs a Stanley controller as discussed in class in place of the vehicle_controller node.
* Pseudo Code for your Node. More information can be found here
* setup.py file filled out
* package.xml file filled out properly
* This is a qualitative assessment so no submissions are needed. You will need to run the node at Flavet Field by the due date. Grading will be based on the closeness to the path given.
Warning
The names of topics are important. Writing the topic names incorrectly will break the node.
Creating the Path to Follow
The points that you will be visiting are available here. You will then need to create a path in google earth that follows these points and output a path .kml file.
To convert the .kml file, navigate to the scripts directory inside the eml4930_gps_nav repo. There is a .kml file converter to .txt of poses. You can do this by running the following command inside the scripts folder.
python3 kml_to_route.py example_file.kml output_file.txt
Stanley Controller
The stanley controller is controller developed by the Stanford Racing Team during the 2005 DARPA Grand Challenge. Stanley, the teams vehicle, went on to win the competition.
The outputs and inputs for this controller are given below.
- Inputs:
Vehicle Pose: \(x_{veh}\). \(y_{veh}\), \(\theta_{veh}\)
Closest Pose on Path: \(x_{c}\), \(y_{c}\), \(\theta_{c}\)
- Outputs:
Steering Angle: \(\phi\)
The objective is to determine the steering angle to drive the vehicle to the path based on the current vehicle position and orientation. It will be minimizing the difference in heading and the the cross track error \(e_{cte}\).
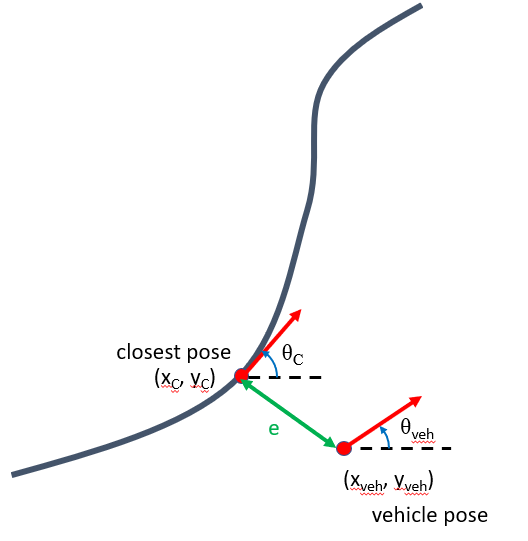
Figure 1: Definition of Stanley Controller Problem
The governing equation of this controller is as follows,
where \(e_{cte}\) is the distance between the closest and the vehicle projected along the closest pose’s y coordinates and \(v\) is the speed.
Note
\(e_{cte}\) will be negative if the closest point on the path is to the right of the vehicle pose.
Controller File Template
To calculate the crosstrack error call the function
crosstrack_error,error_heading_rad, _ = get_cross_track_and_heading_error(closest_pt,heading_closest_rad,vehicle_pt, heading_vehicle_rad)
This should return a tuple with the two errors you need for the stanley.
The template file can be downloaded below,
Put your controller in the main_timer_callback onwards.
Simulate your project by using a launch file similar to this,
Launch File for Point at Carrot
Note
Your launch file should be in a launch folder inside your package, something like package_name/launch/example_launch.py . Otherwise when you build the package it will fail.
Use the setup.py file given below to allow for launch files to work.